~ Natarājāsana with Linda
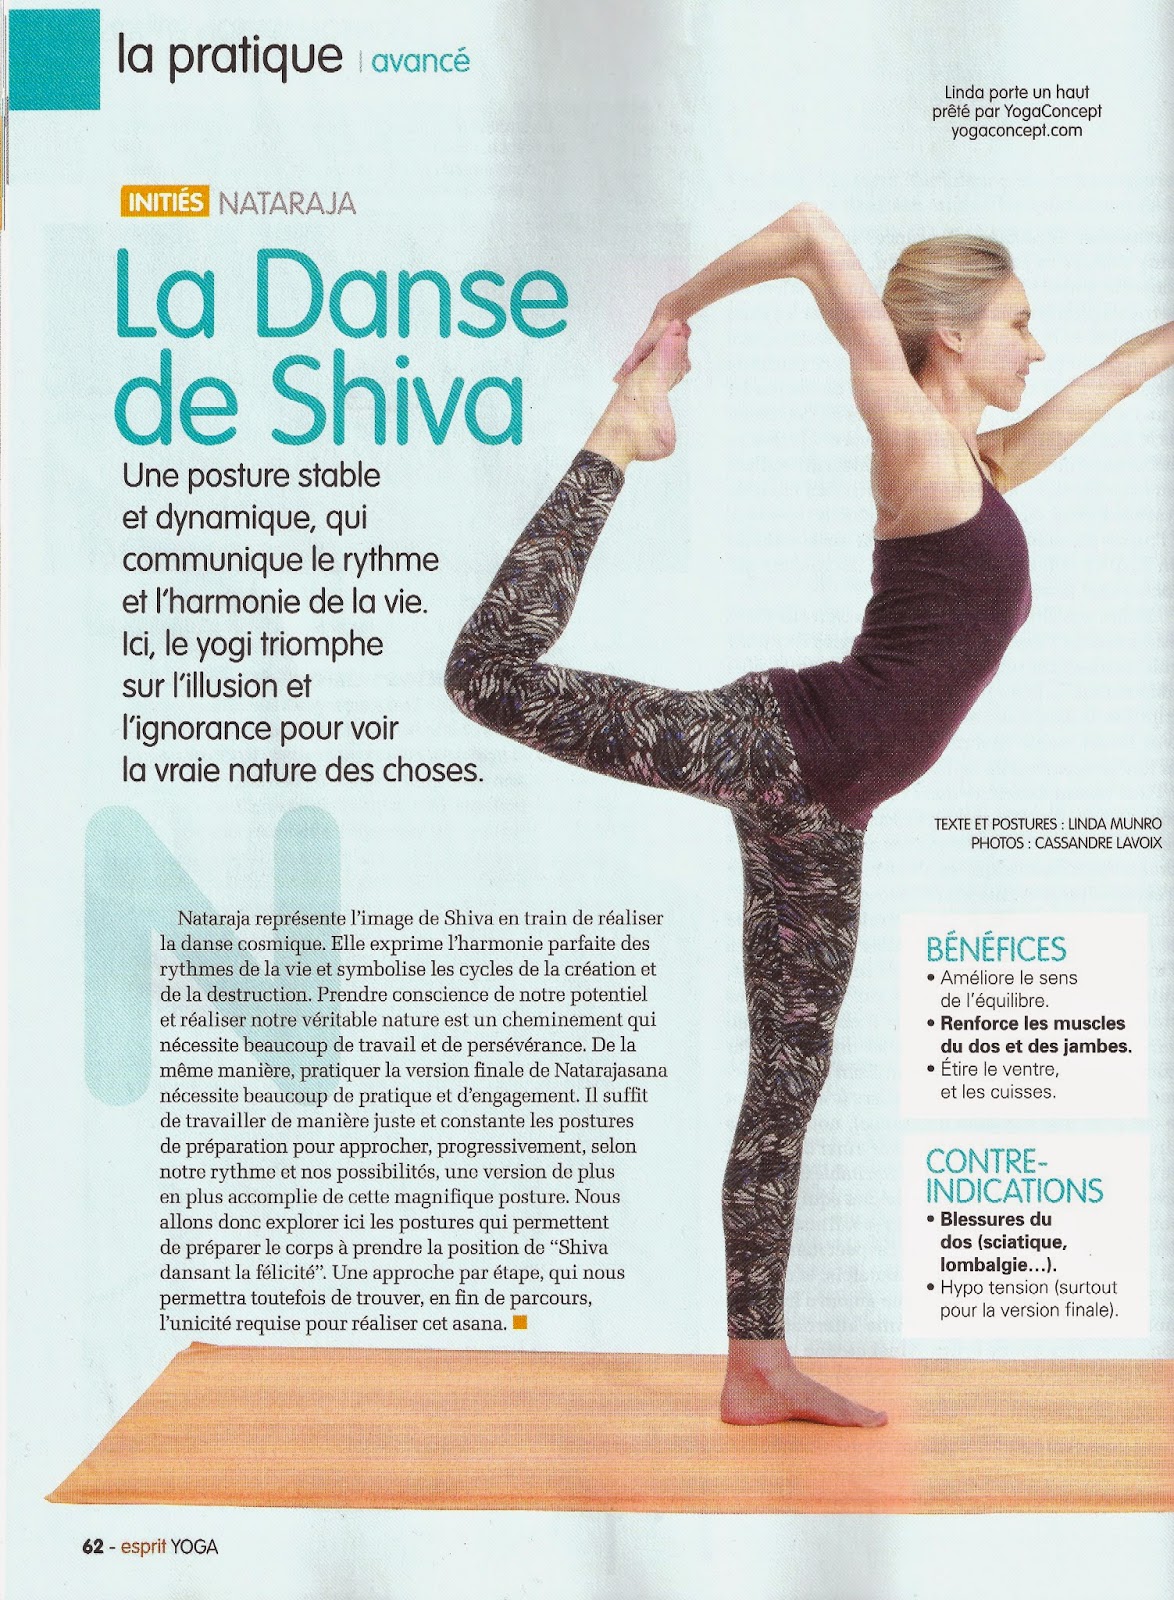
Nataraja is a depiction of Shiva as the cosmic dancer who performs his divine dance of destruction and makes preparations for the god Brahma to continue the process of creation. So in this workshop we will destroy any preconceived notions of what we ‘can’ and ‘cannot’ do; of what we think back bending ‘is’ and what ‘it isn’t’, coming with an open and clear mind to work towards this beautiful and powerful pose!
Nataraja est la représentation de Shiva comme danseur cosmique performant la danse divine de la destruction qui préparera le Dieux Brahma à continuer le processus de la création. Pendant cette journée nous allons casser les idées préconçues de ce que nous pouvons ou ne pouvons pas faire. Nous travaillerons sur l’idée de ce que nous pensons qu’un « back bending » un « pont » peut ou ne peut pas être. Nous pourrons donc aborder cette formidable posture avec un esprit ouvert et clair.

The Dance of Bliss ~ Natarājāsana
Nataraj is the image of Lord Shiva performing the cosmic dance, which symbolizes the cosmic cycles of creation and destruction. It is a marvelously unified and dynamic composition expressing the rhythm and harmony of life. He is elegantly standing upon the dwarf of forgetfulness; the personification of illusion and ignorance over whom Shiva triumphs.
Just as overcoming forgetfulness and realizing our true Self takes tremendous work and commitment; performing the asana Natarājāsana also requires a long-time, committed practice. There is no need to rush it; there is only the need to work intelligently and steadily on the preparations that are accessible today and now to teach us patient persistence.
In this article we will explore all the components, which are needed to imitate Lord Siva’s dance of Bliss and at the end bring all the pieces together to re-create the oneness needed to perform this beautiful posture of Cosmic Bliss. Before starting the preparations it is a good idea to first do some sun salutations and standing poses to heat up the body and then we are on our way to Bliss!
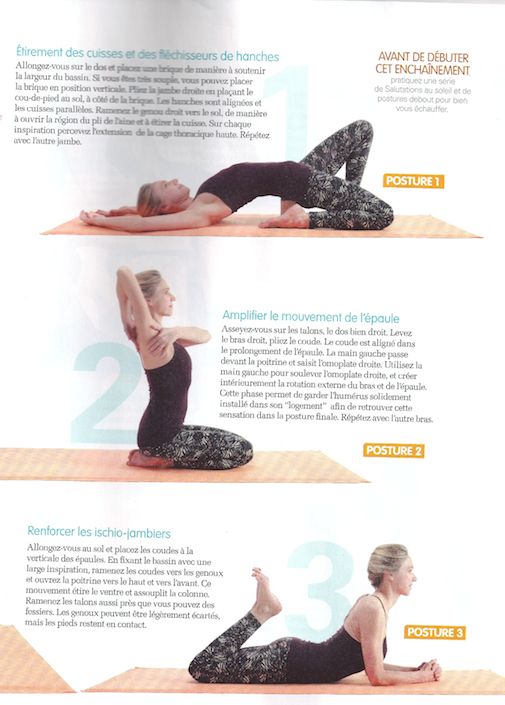
1. LENGTHENING THE THIGHS AND HIP FLEXORS
Lying on the back we lift the hips up and place a yoga block under the pelvis in a way that supports the width of the body. It’s best to start with the block on its shortest side however, for those already quite flexible it can be placed on its higher side. Once the block is in position, we fold one leg back so that the top of the foot is on the floor to the side of the block. With mindfulness we ensure that the hip bones are the same level, the thigh bones are parallel and then we can start to reach the knee down and away to bring more lengthening to the front of the leg and hip. Then we can unfold the leg and work with the other leg.
2. EXPLORING THE SHOULDER MOVEMENT
Sitting on the heels we raise one arm up over the head, with the elbow bent and directly in line with the shoulder (not too close to the head and not splaying out beyond the width of the shoulder) so that the hand will be behind the back and take the opposite hand to the shoulder blade. Using this hand to lift the shoulder blade and then sliding it up to swivel the upper arm so that the outer arm is moving forward and the inner arm is moving back. With this movement the upper arm bone (humerus) will be secure and safe in the shoulder socket. We need to memorize this feeling, as it is how we want the arm to be for the final version of the pose.
3. STRONG HAMSTRINGS
To lift the leg up in Natarājāsana we use the hamstrings so in this exercise we can practice engaging them and making them stronger. Lying on the floor on the belly with the elbows under the shoulders, we tug the elbows towards the knees as the chest lengthens forward, this will lengthen the belly and the spine. Then bending the knees we try to reach the heels in the direction of the buttocks as much as we can. The knees can be slightly apart but the feet stay touching.
4. BUJANGASANA
Next we are going to strengthen the back muscles with this cobra pose. With the legs straight out behind us, toes touching, we press the toes into the floor which will lift the knees from the floor. Then placing the hands along side the waist we curl the back as if the shoulder blades would lift through the body to the upper chest. Paying attention not to squeeze the buttocks, instead to pull in the lower abdominals and wrap the sides of the hips forward to counter the affect of the gluteus maximus externally rotating the legs.
5. LIFTING ONE LEG OFF THE FLOOR
We take a yoga belt and loop it over one ankle and then reminding ourselves of the shoulder movement we did while sitting up, we hold the other end of the yoga belt. The opposite arm is used as support as we engage the arm muscles to lift the leg away from the floor. It’s important to be mindful to keep the knee from splaying out to the side; it must stay directly behind the hip. After holding it for a few breaths we do the same thing with the other leg.
6. FINDING BALANCE
So now we’ve worked on the strength and flexibility it’s time to balance on one leg! Utthita Hasta Pādānguşthāsana is a classic balancing pose that allows us to learn to keep the standing leg straight, strong and stable. In fact, in the traditional Ashtanga Yoga system Natarājāsana is done directly from this pose!
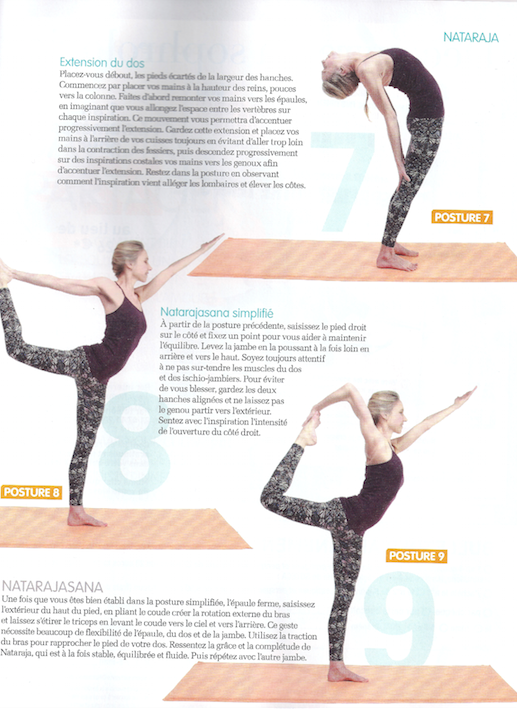
7. ARCHING BACK
Separating the feet hip width apart we start by placing our thumbs on the sacrum area and the fingers pointing away from the center of the back. Then we ‘walk’ our hands up our back, lengthening the space between each and every vertebrae as we work towards the shoulder blades. Once we reach as high as we can we want to feel as if the shoulder blades are coming through the upper chest. Preserving the opening, we now place the hands on the upper inner thighs from behind. We use our hands to remind us to keep the buttocks from squeezing and the legs from turning out as walk the hands down the legs.
8. SOFTENING THE HAMSTRINGS
If we go into the pose too hastily we risk getting cramps in the hamstrings. This in-between stance will help us to verify that the leg muscles start the actions without contraction and to be mindful not to torque the pelvis, risking an asymmetrical back bend for the spine. Then we can go directly to either the simplified version of Natarājāsana (point 9), the full expression of the pose (point 10) or even in between the two by using a yoga belt in the similar way we did on the floor in point 5.
9. NATARAJASANA SIMPLIFIED
Putting it all together. From the previous step, now we take the hand to the inner side of the foot and while keeping a steady gazing point we pick up the leg, extending both up and back to allow for length in the spine despite the bending. It’s important for the health of the back to keep the hips level and avoid allowing the knee to go out to the side beyond the width of the hips. This will keep the spine supple and strong while doing this beautiful pose.
10. GOING FURTHER TO FULL NATARAJASANA
Once we are well established in the simplified version and are able to keep the shoulder alignment safe as we learned earlier, then we can take the inner foot from the outside of the leg. This is tricky and takes quite a bit of shoulder, back and leg flexibility. When the foot is held firmly we swivel the elbow forward and bring it along side the head. Voila!
Benefits:
Perfects the sense of balance
Strengthens the back muscles and the legs
Stretches the abdomen, groins and thighs
Contra-indications:
Back injury
Low blood pressure